


There is no OBD port on the Honda SMX or Stepwagon 96-01, diagnostics of the Engine Management Light is done via flash codes.
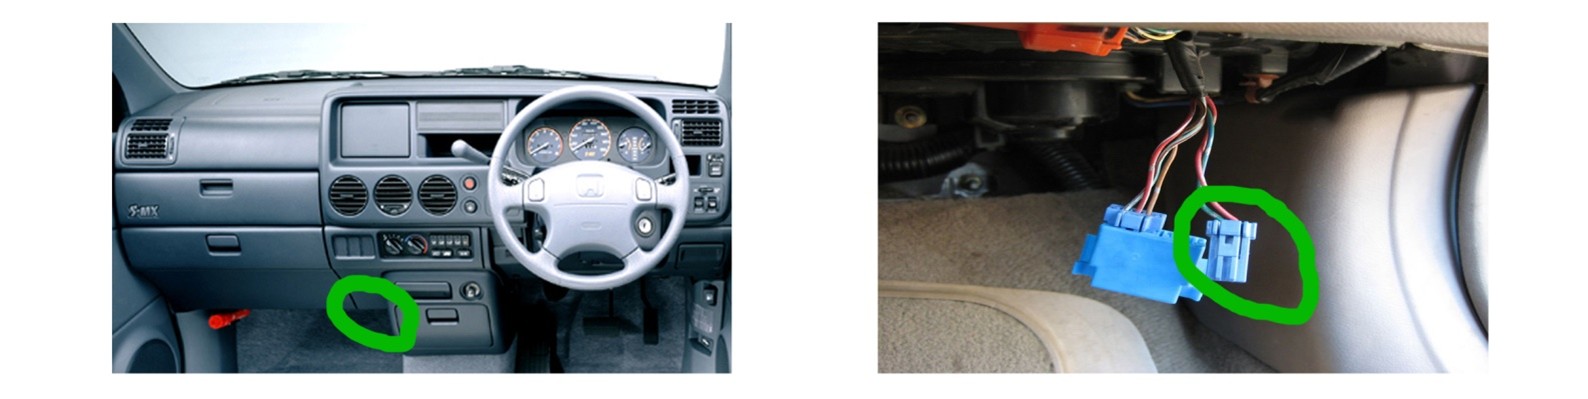
1. Find the 2 pin blue connector, this is located below the glove box, near the heating control side, it can be tucked quite away so look hard. (See images above)
2. Insert a jumper wire (use a paperclip or some wire)
3. Put your key in the ignition and turn forward to the second or "ON" setting
4. Now you need to count the flashes. It's basically like Morse code, with short and long duration's.
Long duration come first, followed by shorts. Long duration = 10 each, short duration = 1 each.
Example: Long Long Long Long Short Short Short = 43. There is about a half second pause between each same duration and about a full second pause before switching to a different duration.
Example: Code 22 = Long (half second pause), Long (full second pause), Short (half second pause), Short. If there is more than one code stored for a particular system, there will be a 2-3 second pause between the codes.
11 - Wheel Sensor: RF (Open/Short to Body Ground/Short to Power)
12 - Wheel Sensor: RF (Electrical Noise/Intermittent Interruption)
13 - Wheel Sensor: LF (Open/Short to Body Ground/Short to Power)
14 - Wheel Sensor: LF (Electrical Noise/Intermittent Interruption)
15 - Wheel Sensor: RR (Open/Short to Body Ground/Short to Power)
16 - Wheel Sensor: RR (Electrical Noise/Intermittent Interruption)
17 - Wheel Sensor: LR (Open/Short to Body Ground/Short to Power)
18 - Wheel Sensor: LR (Electrical Noise/Intermittent Interruption)
21 - Pulser: RF
22 - Pulser: LF
23 - Pulser: RR
24 - Pulser: LR
31 - Solenoid: RF-In
32 - Solenoid: RF-Out
33 - Solenoid: LF-In
34 - Solenoid: LF-Out
35 - Solenoid: RR-In
36 - Solenoid: RR-Out
37 - Solenoid: LR-In
38 - Solenoid: LR-Out
41 - Wheel Lock: RF
42 - Wheel Lock: LF
43 - Wheel Lock: RR
44 - Wheel Lock: LR
51 - Motor Lock
52 - Motor Stuck OFF
53 - Motor Stuck ON
54 - Fail-safe Relay
61 - Ignition Voltage
62 - Ignition Voltage
71 - Different Diameter Tires
81 - Central Processing Unit (CPU)
With the jumper in place, follow the steps below:
• Turn witch to the on (not start) position
• As soon as the abs light comes on, press the brake pedal
• As soon as the abs light turns off, release the brake pedal
• As soon as the abs light comes on, press the brake pedal again
• As soon as the abs light turns off, release the brake pedal
• The abs light will flash 2 times indicating there are no more fault codes and the light is reset
check_circle
check_circle